Sending Smiles Hello Card (Inspired by Creativity Now)
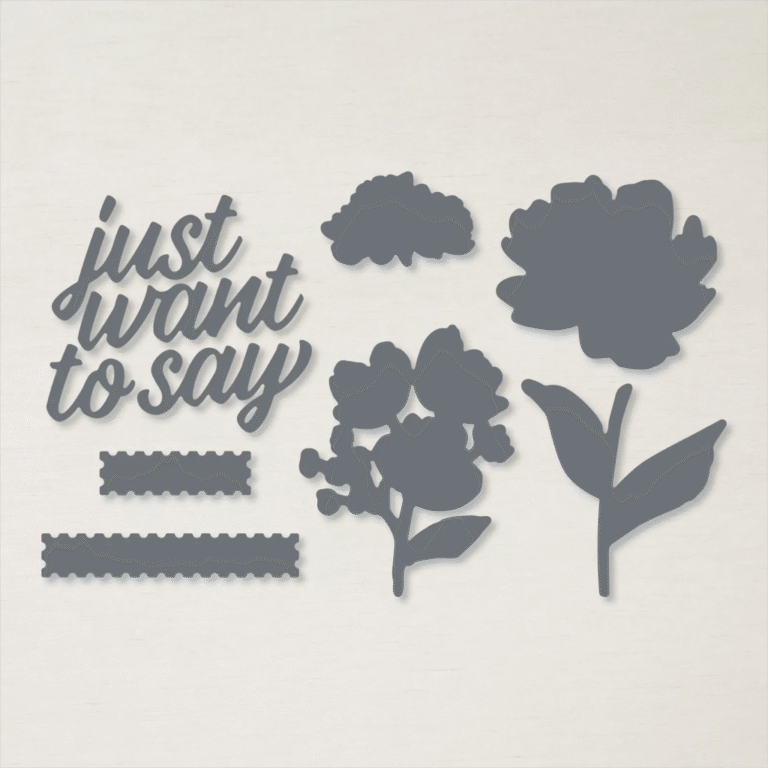
This past weekend, I was excited to be able to take part in the Creativity Now virtual event. We used the new Translucent Florals bundle :

It won’t be available for a bit – (I’m thinking in the new mini catalog in September . . ) but it should be a hot ticket. It has a lot of sentiments and the flower builder dies are so easy to use.
I thought I’d make some alternatives using a similar layout to the projects we made at this event – in case you really wanted to make something and are pining over the wait for the new bundle – haha!
Here is the first card we made during the event – and a stepped up version! I really enjoyed the additional project for each layout. All of the projects ‘stepped up’ cards were really just adding one or two additional items or techniques – something so attainable. I may try this at my next in-person class. Anyhoo – back to the first cards we made during the event (scroll on through):
I used the simple layout from the first card – let’s compare the planned project and my alternative:


To make this project, you’ll need the following supplies:
- Cardstock/Paper: Poppy Parade (8 ½” x 5 ½”, scored at 4 ¼” on the long side), Basic White (4” x 5 ¼” and 4” x 3/8”)
- Ink: Poppy Parade, Garden Green, Daffodil Delight, and Berry Burst
- Basic Tools: Snips, Trimmer, Adhesives (Glue, Glue Dots, Dimensionals)
- Additional Tools/Supplies: Stampin’ Cut & Emboss Machine
- Stamps/Dies: Sending Smiles Photopolymer Stamp Set and the Deckled Rectangles Dies
To make this project, follow these steps:
- On the large piece of Basic White, stamp two stem images in Garden Green and top off with Poppy Parade flowers. Fill in the flowers’ centers with Daffodil Delight. Using the second and third largest rectangle dies from the Deckled Rectangles set, run this stamped Basic White panel through the Stampin’ Cut & Emboss Machine. Run both dies through at the same time so that you get a nice little frame piece.
- Using Dimensionals, adhere both of these pieces (together – don’t separate them) to the card front.
- Stamp your chosen sentiment on the small strip of Basic White using Berry Burst ink. Trim either side on an angle and affix it to the front of the card using Dimensionals.
Here are the items that I used to make this quick card:
Product List")


Thank you so much for stopping by and taking a look at my projects. I’d love to see yours so feel free to drop them in the comments.
Don’t forget to enroll in the Stampin’ Rewards program to build up discounts on your next purchase.
Here are links to my other social media sites – I’d love for you to follow me there, too!
Join my Facebook group
Follow me on Instagram
Follow me on Pinterest
Have a great day – and I hope you get to do something crafty!
If you are looking at that list of products and want it all, now through the end of October is a great time to join Stampin’ Up!
Option 1: Get 35% OFF the normal cost of a Stampin’ Up! Starter Kit. Those who select this option will receive $125 worth of product for only $64.35!
Option 2: Get 35% MORE product with their Starter Kit. Those who select this option will receive $168.75 worth of product by spending $99 !
It gets better! Those who sign up for a Starter Kit during this offer will also be automatically registered for FREE* to our virtual OnStage event on 11 November—a $77 value!
Whether you want to give being a demo a shot for business reasons or to get that great discount as a ‘hobby’ demonstrator, now is the time to do so. Contact me for more information – or if you’re ready to go, click here to get started.
Thanks so much for stopping by and taking a look – if you like what you see, please share on your social media pages. And please subscribe – you’ll get all of my new projects delivered straight to your inbox.
Thanks so much for taking a look at my alternative take on the Creativity Now project! I hope you liked it. Have a happy, crafty day!