All Together Collection: Love Changes Everything
Stampin’ Up! has introduced a new collection that’s available today – the All Together Collection. It consists of a stamp set, coordinating dies, a pack of 6″ x 6″ Designer Series Paper, and 5 sets of Stampin’ Blends in various skin tones. They can be purchased as one or as individual components.
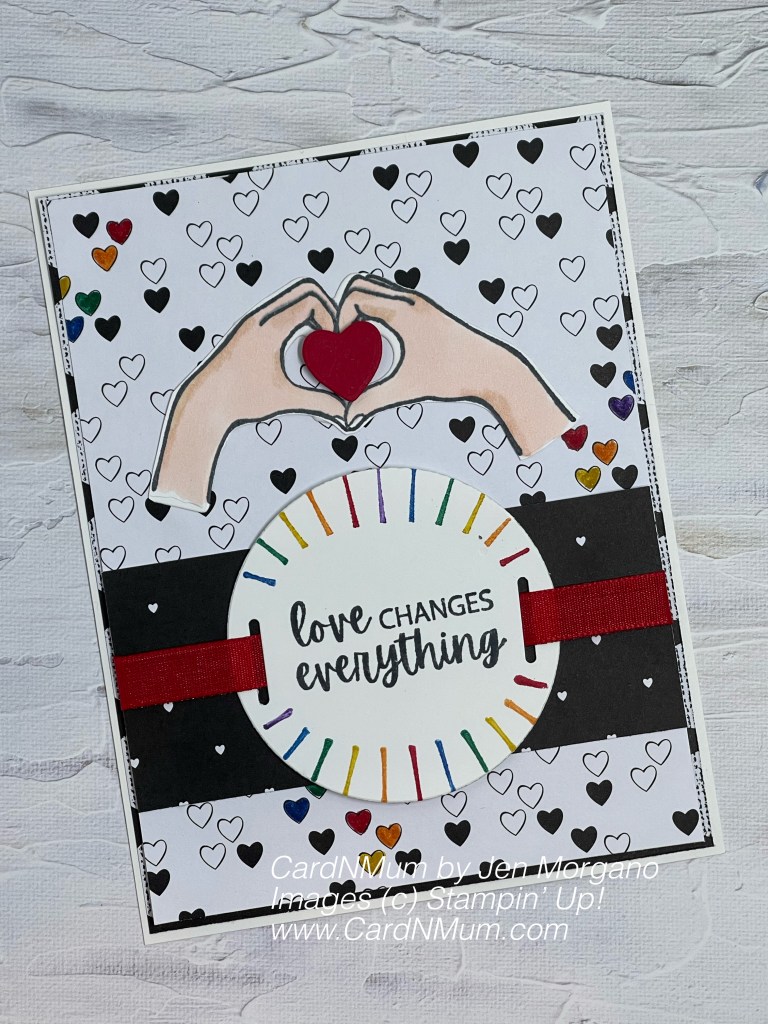
I have been on a little bit of a Brights kick lately so I couldn’t just leave the black and white DSP alone. For this card, I added some pops of color throughout.
To make this card, you’ll need the following supplies:
- Thick Basic White cardstock, 8 1/2″ x 5 1/2″, scored at 4 1/4″ along the long side
- (3) pieces of the All Together DSP: 4 1/8″ x 5 3/8″, 4″ x 5 1/4″, and 4″ x 1 3/4″
- scraps of Basic White and Real Red
- 7″ length of Faux Linen Ribbon in Real Red
- Tuxedo Black Memento Ink
- All Together Bundle (stamps/dies)
- Stampin’ Blends Light Combo Pack
- Layering Circles Dies
- Label Me Fancy punch
- Many Marvelous Markers
- Basic Supplies (Trimmer, Snips, Stampin’ Cut & Emboss Machine”, Dimensionals, Multipurpose Glue)
To put the card together, I did the following:
- Adhere the largest piece of DSP to the card base
- Stamp the ‘love hands’ in Tuxedo Black on a scrap of Basic White- color in using the Light Combo pack Blends; cut out using coordinating die with the Stampin’ Cut & Emboss Machine. I also cut out a heart using a scrap of Real Red and the heart die from the set.
- Stamp sentiment in Tuxedo Black on a larger scrap of Basic White; using Stampin’ Write markers from the Many Marvelous Markers set, color in the individual lines of the ‘starburst’ stamp. I chose a rainbow theme – Real Red, Pumpkin Pie, Crushed Curry, Shaded Spruce, Pacific Point, and Gorgeous Grape. I stamped two of these ‘rainbows’ around the sentiment. I then cut that out with a circle die from the Layering Circles set. I then used the Label Me Fancy punch to punch slits on either side of the sentiment to allow for the ribbon.
- I used the same markers in the prior step to color in various hearts on the DSP.
- I adhered the smallest piece of DSP along the bottom center (vertically) of the remaining piece of DSP using liquid glue. I wove the ribbon through the slits on the sentiment piece and adhered the sentiment to the smaller DSP panel with glue. I taped the ends of the ribbon to the back of the whole DSP panel using regular transparent tape.
- I used liquid glue to adhere this DSP panel to the card base. I then used glue to adhere the hands over the sentiment. I used a Dimensional to affix the heart.
I think this set is so versatile and I look forward to using the different skin tone Blends more. I will admit, coloring and shading are not my strong points but maybe if I keep working on it – – – – I’ll get better.
I’ve included links to the products I used below – they are available in my online store now.
The link for the collection is here:
Product List


 Faux Linen Ribbon")


Thank you so much for stopping by and taking a look at my projects. I’d love to see yours so feel free to drop them in the comments.
Don’t forget to enroll in the Stampin’ Rewards program to build up discounts on your next purchase.
Here are links to my other social media sites – I’d love for you to follow me there, too!
Join my Facebook group
Follow me on Instagram
Follow me on Pinterest
Have a great day – and I hope you get to do something crafty!
Remember, Sale-A-Bration is going on for January and February. For every 60 dollars spent (before shipping and taxes), you are entitled to free products from the Sale-A-Bration catalog. So exciting!! Joining Stampin Up! now (if interested) has a some great options of product in addition to your starter kit! Woo hoo! Click that link to take a peek!
Thanks for looking and if you like what you see, please subscribe:
Happy crafting!