Stamped with Love Hello Card
Here is another card that I created using the Stamped with Love stamp set. It was a quick and easy card.
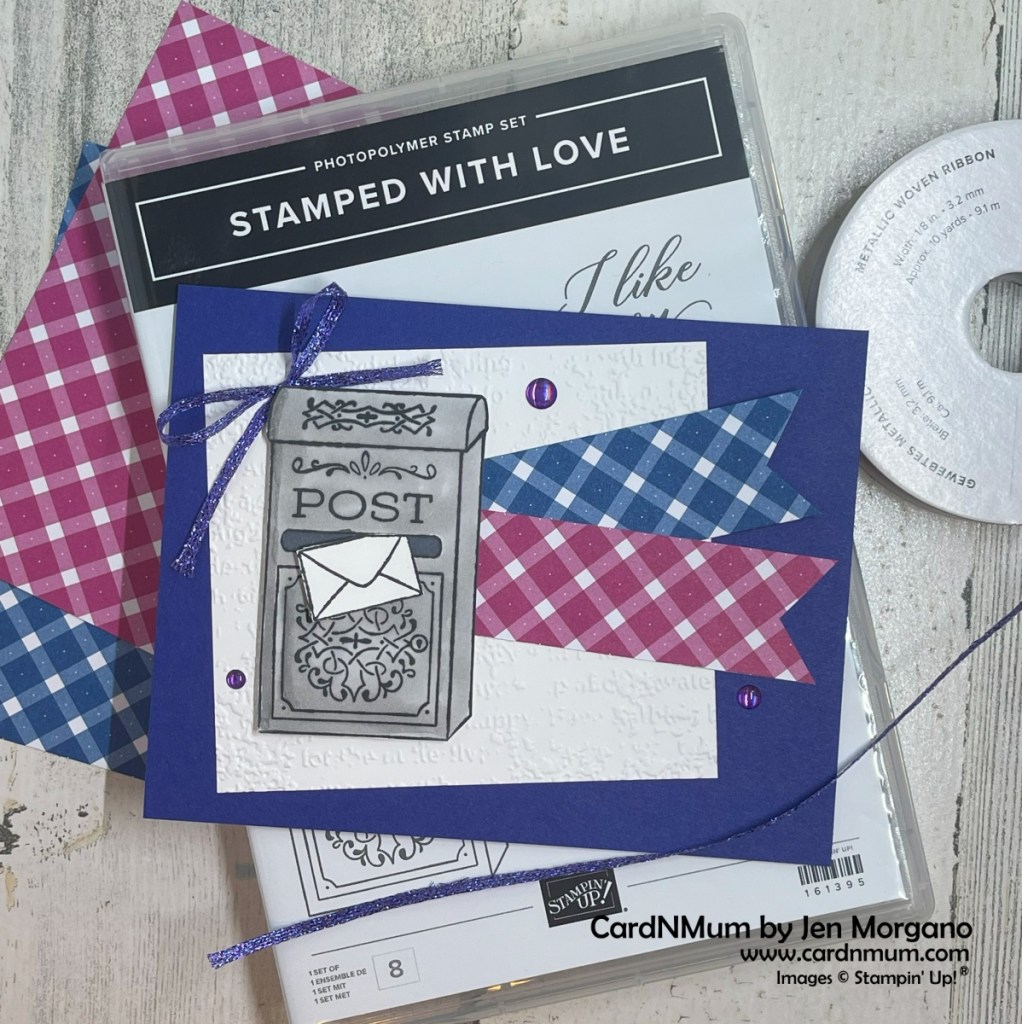
To make this project, you’ll need the following supplies:
- Cardstock/Paper: Starry Sky (4 ¼” x 11”, scored at 5 ½” on the long side); Basic White (3” x 3” square to be embossed, 4” x 5 ¼” piece for inside panel, scrap for post box); Glorious Gingham DSP (2 pieces cut at 1” x 3 ½” – I used Blueberry Bushel and Berry Burst)
- Ink: Memento in Tuxedo Black
- Basic Tools: Snips, Trimmer, Adhesives (Glue, Glue Dots, Dimensionals)
- Additional Tools/Supplies: Smoky Slate Blends Combo Pack, Basic Black Blends Combo Pack, Timeworn Type 3D Embossing Folder, Starry Sky Metallic Ribbon, Glossy Dots
- Stamps/Dies: Stamped with Love Photopolymer Stamp Set
To make this project, follow these steps:
- Stamp the postbox image in Tuxedo Black ink on a scrap of Basic White paper. Color the box using the Smoky Slate Blends (I colored the letter opening with Basic Black Blends), then fussy cut. Stamp another postbox image on a scrap of Basic White and fussy cut the ‘letter’ image out.
- Emboss the 3” x 3” piece of Basic White using the Timeworn Type EF and the Stampin’ Cut & Emboss Machine. Adhere this 3” embossed square to the Starry Sky card base at somewhat of an angle.
- Trim one end of the DSP pieces into a banner (Notch out a ‘v’ shape). Adhere these pieces to the right of center on the Basic White square.
- Adhere the post box to the white square as shown (Use Stampin’ Dimensionals). Using a glue dot on the top of the cut-out ‘letter’ and a Mini Dimensional on the bottom, adhere the ‘letter’ to the postbox. The difference in height gives it a bit of an illusion of a letter popping out.
- Tie a bow using the Starry Sky Metallic Mesh ribbon and affix it to the card front using a glue dot (I tucked it behind the upper right corner of the post box).
- Finish the card off with a few coordinating Glossy Dots.
I’ve added the products that I used to make this project below – the links will bring you straight to my online store:
Product List")


 Designer Series Paper")


 Metallic Woven Ribbon")


Thank you so much for stopping by and taking a look at my projects. I’d love to see yours so feel free to drop them in the comments.
Don’t forget to enroll in the Stampin’ Rewards program to build up discounts on your next purchase.
Here are links to my other social media sites – I’d love for you to follow me there, too!
Join my Facebook group
Follow me on Instagram
Follow me on Pinterest
Have a great day – and I hope you get to do something crafty!
If you are looking at that list of products and want it all, now through the end of October is a great time to join Stampin’ Up!
Option 1: Get 35% OFF the normal cost of a Stampin’ Up! Starter Kit. Those who select this option will receive $125 worth of product for only $64.35!
Option 2: Get 35% MORE product with their Starter Kit. Those who select this option will receive $168.75 worth of product by spending $99 !
It gets better! Those who sign up for a Starter Kit during this offer will also be automatically registered for FREE* to our virtual OnStage event on 11 November—a $77 value!
Whether you want to give being a demo a shot for business reasons or to get that great discount as a ‘hobby’ demonstrator, now is the time to do so. Contact me for more information – or if you’re ready to go, click here to get started.
Thanks so much for stopping by and taking a look – if you like what you see, please share on your social media pages. And please subscribe – you’ll get all of my new projects delivered straight to your inbox.
I hope you have a happy, crafty day!
