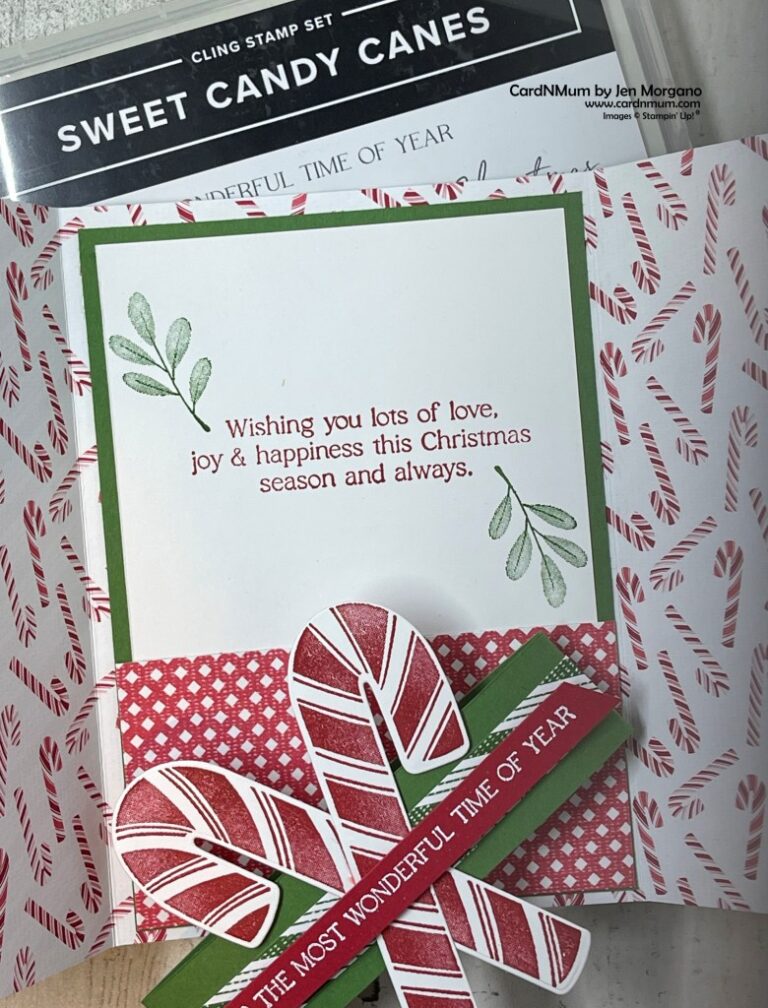
Simple Gift Card Holder
This style of gift card holders was the first type I tried my hands at years ago. I remember I was getting ready for my first ever craft fair and I wanted to have a smattering of gift card holders available. I turned to Pinterest (my old friend) and did a search. This one popped up and it was love at first sight. It’s my go to – it’s quick and easy and you can make a lot in a little time (handy if you do craft fairs or have 18,000 teachers, bus drivers, co-workers to gift to this season.) I also like that you can keep it plain or embellish it to the cows come home.

To make this project, you’ll need the following supplies:
- Cardstock/Paper: Poppy Parade (3 ½” x 8 ½”, scored at 2” and 6” on the long side), Sweetest Christmas DSP (3 ¼” x 1 ¾”, 3 ¼” x 2 ¼”), Pool Party (1” x 8 ½”), Basic White scraps
- Inks: Poppy Parade and Shaded Sprue
- Basic Tools: Snips, Trimmer, Adhesives (Glue, Glue Dots), Clear Blocks
- Additional Tools/Supplies: Mini Stampin’ Cut & Emboss Machine, Iridescent Trim
- Stamps/Dies: Sweet Candy Canes Bundle (stamp set/dies)
To make this project, follow these steps:
- Burnish score line well using a bone folder
- Adhere DSP to front-facing flaps
- Glue larger section down, using either Tear & Tape or glue – only apply on the outer edges so that once dry a gift card can fit it
- Stamp candy canes and sentiment and cut out the images using the coordinating dies
- Wrap Pool Party belly band around the closed gift card holder and secure in the back using Tear & Tape or glue
- Adhere candy canes to the front of holder (adhere to belly band)
- Take a 16” length of Iridescent Trim and loop through holes on label and secure with a bow
Here’s a quick video of the process with some tips:
I’ve included links below to the products I’ve used – they’ll take you straight to my online store – contact me with any questions.
Product List")
 Designer Series Paper")


 Iridescent Trim")


Thank you so much for stopping by and taking a look at my projects. I’d love to see yours so feel free to drop them in the comments.
Don’t forget to enroll in the Stampin’ Rewards program to build up discounts on your next purchase.
Here are links to my other social media sites – I’d love for you to follow me there, too!
Join my Facebook group
Follow me on Instagram
Follow me on Pinterest
Have a great day – and I hope you get to do something crafty!
If you are looking at that list of products and want it all, now through the end of October is a great time to join Stampin’ Up!
Option 1: Get 35% OFF the normal cost of a Stampin’ Up! Starter Kit. Those who select this option will receive $125 worth of product for only $64.35!
Option 2: Get 35% MORE product with their Starter Kit. Those who select this option will receive $168.75 worth of product by spending $99 !
It gets better! Those who sign up for a Starter Kit during this offer will also be automatically registered for FREE* to our virtual OnStage event on 11 November—a $77 value!
Whether you want to give being a demo a shot for business reasons or to get that great discount as a ‘hobby’ demonstrator, now is the time to do so. Contact me for more information – or if you’re ready to go, click here to get started.
Thanks so much for stopping by and taking a look – if you like what you see, please share on your social media pages. And please subscribe – you’ll get all of my new projects delivered straight to your inbox.
Please subscribe if you like what you see and want to get these tutorials sent straight to you inbox –
I hope you enjoyed this project – if you make one, please share it in the comments. I’d love to see your creations –
Have a happy crafty day!