Celebration Expression Scrapbook Layout
Here is quite possibly my favorite project made using the Celebration Expressions Memories & More Card Pack. I did not use the Layered Thoughts stamp set with this project. Instead, I used the Birthday Celebration stamp set. I also added a few pieces of the Turtle-y Cute DSP (the colors went great together).
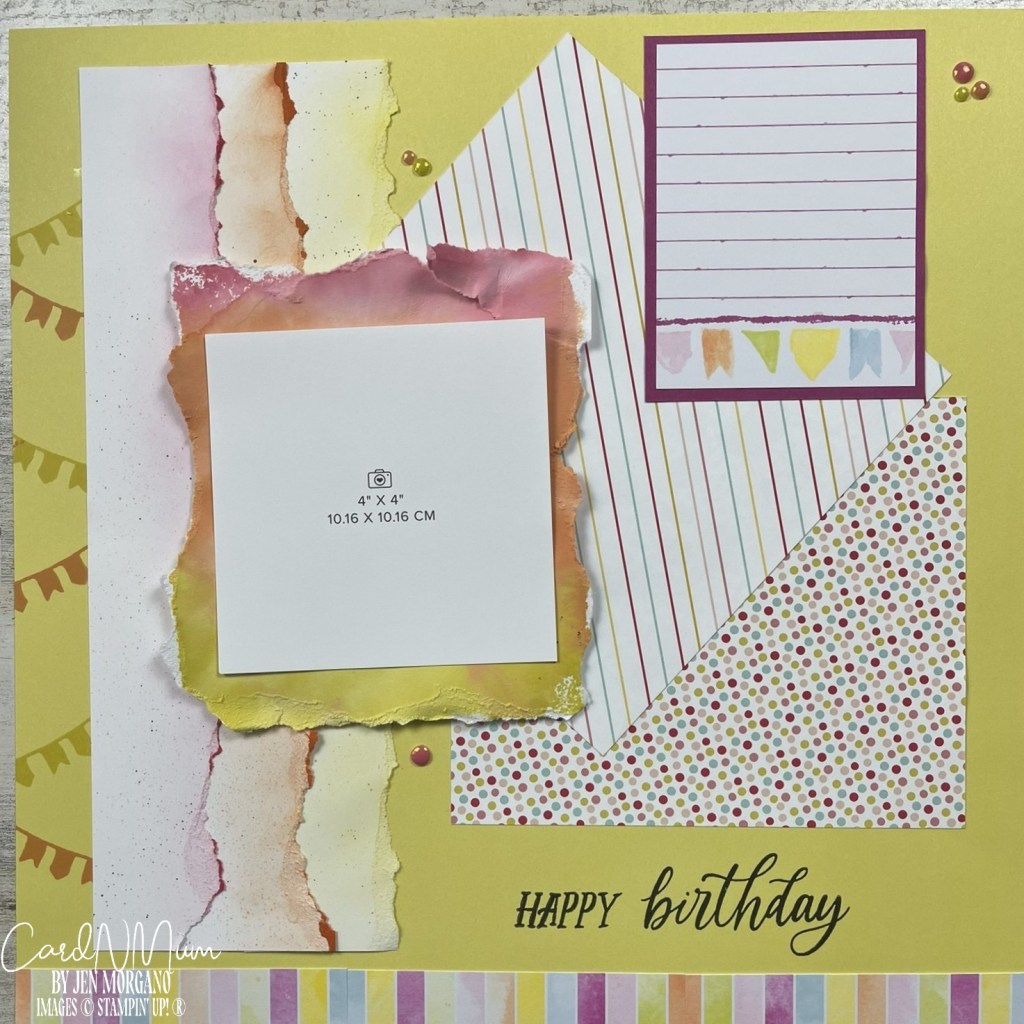
I started with a 12″ x 12″ piece of Two-Tone Darling Duckling paper. I cut a 3″ x 4″ piece from the Celebration Expressions Card Pack into 3/4″ x 4″ pieces and adhered them along the bottom of the page using liquid glue.
For the ‘picture’ frame and three pieces underneath, I started with a 12″ x 12″ piece of White Willow. I cut 3 pieces at 2 1/2″ x 10 1/4″(ish) off of that larger sheet. I then tore the right edges off of these pieces. I used blending brushed and Strawberry Slush, Timid Tiger, and Darling Duckling inks to blend these right edges. I then dragged (gently) the ink pads on the torn edges for some more bold color in certain areas. I then flicked my Basic Black blend brush tip inside it’s cap to get speckles on these pieces.
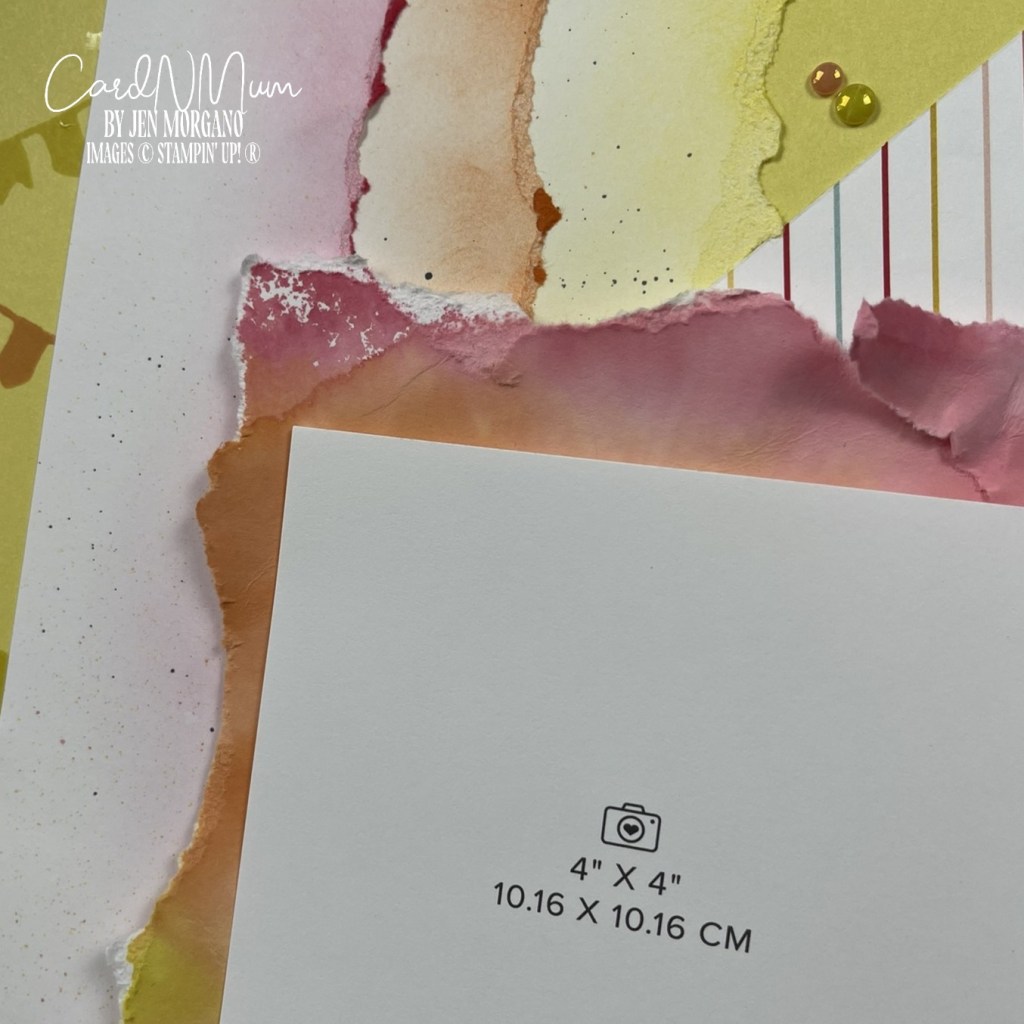
I inked up a size F clear block with these same inks and spritzed with water. I spritze the remaining piece of White Willow and laid my block on top it with the inked-side down. Once that piece dried (it was a bit wet), I tore the edges to make a roughly 4 1/2″ x 5 1/2″ piece that would frame a 4″ x 4″ picture nicely.
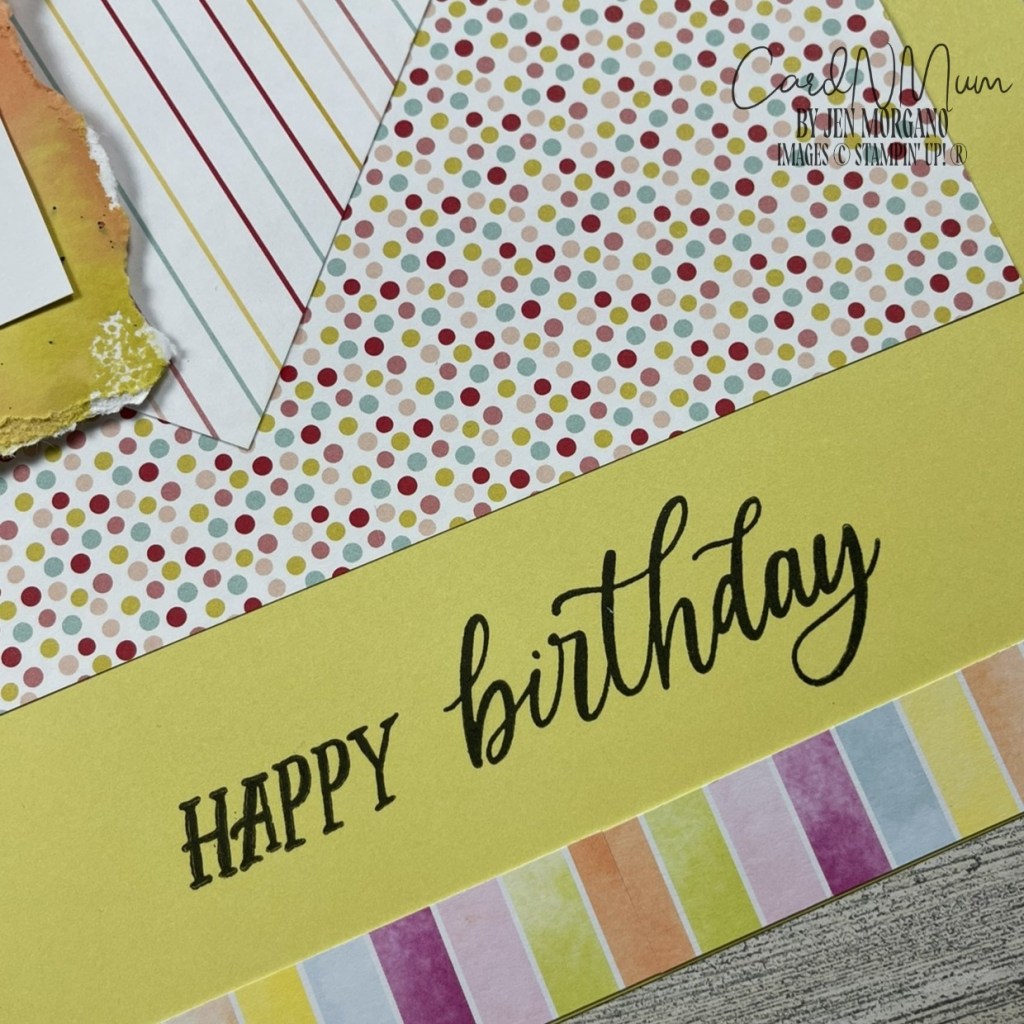
I took two pieces of Turte-y Cute DSP (the polka dot piece was 5″ x 6″ and the striped piece is 6″ x 6″) and adhered them on my base as shown. I stamped my sentiment in the lower right corner between the DSP pieces and the bottom border.
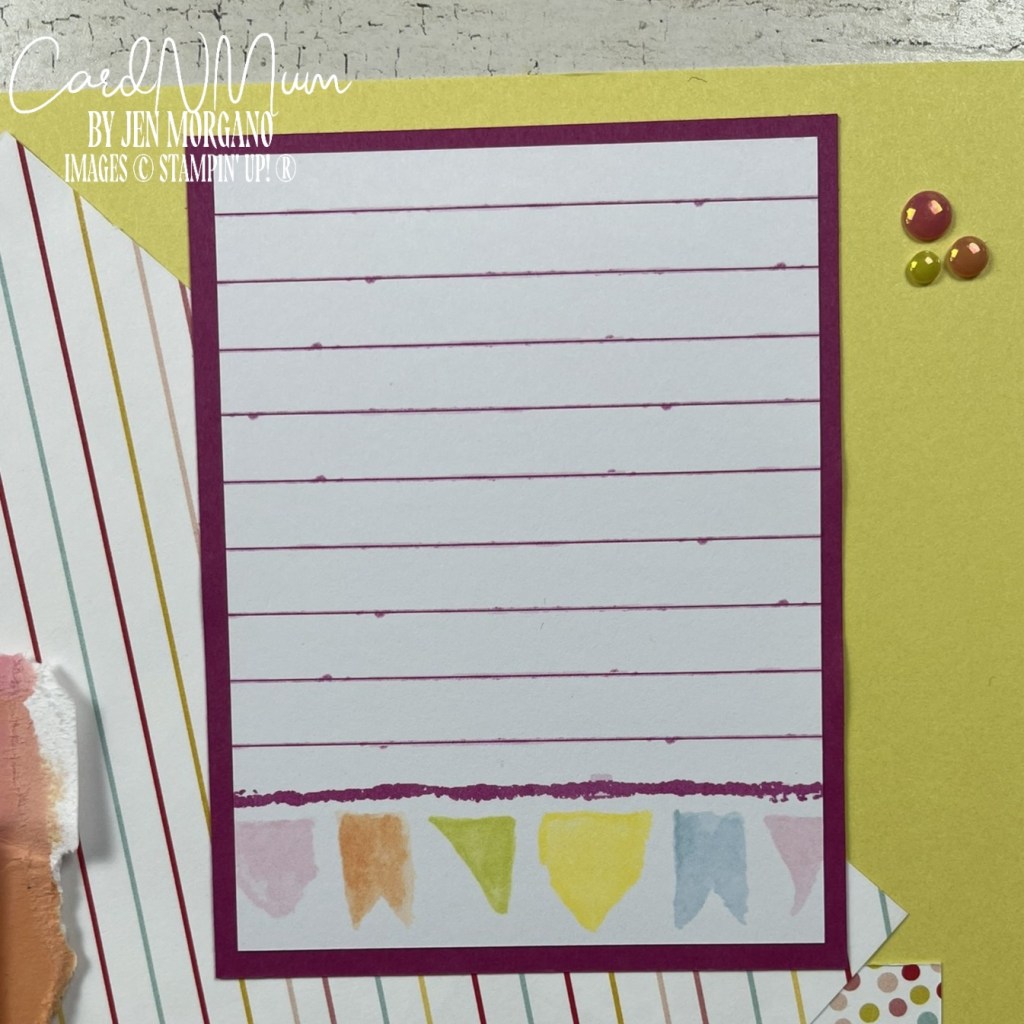
I stamped some flags on the left side of the base and then adhered my torn white pieces. I then adhered my ‘frame’ using Dimensionals. I took a lined 3″ x 4″ card from the Memories & More card pack and framed it with a 3 1/4″ x 4 1/4″ piece of Berry Burst. This was adhered to the upper right corner. I finished off this single page scrapbook layout with some InColor Flat Pearls. I love it!
It was a bit of work but totally worth it – I love how it came out!
Here are the products that I used to make this:
Product List![Birthday Celebration Photopolymer Stamp Set (English) [ 164592 ]](https://assets1.tamsnetwork.com/images/EC042017NF/164592s.jpg "Birthday Celebration Photopolymer Stamp Set (English) [ 164592 ]")
![Celebration Expressions Memories & More Card Pack [ 165307 ]](https://assets1.tamsnetwork.com/images/EC042017NF/165307s.jpg "Celebration Expressions Memories & More Card Pack [ 165307 ]")
![Darling Duckling 12" X 12" (30.5 X 30.5 Cm) Two Tone Cardstock [ 166707 ]](https://assets1.tamsnetwork.com/images/EC042017NF/166707s.jpg "Darling Duckling 12\" X 12\" (30.5 X 30.5 Cm) Two Tone Cardstock [ 166707 ]")
![White Willow 12" X 12" (30.5 X 30.5 Cm) Cardstock [ 166703 ]](https://assets1.tamsnetwork.com/images/EC042017NF/166703s.jpg "White Willow 12\" X 12\" (30.5 X 30.5 Cm) Cardstock [ 166703 ]")
![Berry Burst 8-1/2" X 11" Cardstock [ 144243 ]](https://assets1.tamsnetwork.com/images/EC042017NF/144243s.jpg "Berry Burst 8-1/2\" X 11\" Cardstock [ 144243 ]")
![Turtle Y Cute 12" X 12" (30.5 X 30.5 Cm) Designer Series Paper [ 165221 ]](https://assets1.tamsnetwork.com/images/EC042017NF/165221s.jpg "Turtle Y Cute 12\" X 12\" (30.5 X 30.5 Cm) Designer Series Paper [ 165221 ]")
![Tuxedo Black Memento Ink Pad [ 132708 ]](https://assets1.tamsnetwork.com/images/EC042017NF/132708s.jpg "Tuxedo Black Memento Ink Pad [ 132708 ]")
![Timid Tiger Classic Stampin' Pad [ 165278 ]](https://assets1.tamsnetwork.com/images/EC042017NF/165278s.jpg "Timid Tiger Classic Stampin' Pad [ 165278 ]")
![Darling Duckling Classic Stampin' Pad [ 165277 ]](https://assets1.tamsnetwork.com/images/EC042017NF/165277s.jpg "Darling Duckling Classic Stampin' Pad [ 165277 ]")
![Strawberry Slush Classic Stampin' Pad [ 165286 ]](https://assets1.tamsnetwork.com/images/EC042017NF/165286s.jpg "Strawberry Slush Classic Stampin' Pad [ 165286 ]")
![Basic Black Stampin' Blends Combo Pack [ 154843 ]](https://assets1.tamsnetwork.com/images/EC042017NF/154843s.jpg "Basic Black Stampin' Blends Combo Pack [ 154843 ]")
![2025–2027 In Color™ Flat Pearls [ 165192 ]](https://assets1.tamsnetwork.com/images/EC042017NF/165192s.jpg "2025–2027 In Color™ Flat Pearls [ 165192 ]")
![Multipurpose Liquid Glue [ 110755 ]](https://assets1.tamsnetwork.com/images/EC042017NF/110755s.jpg "Multipurpose Liquid Glue [ 110755 ]")
![Stampin' Dimensionals [ 104430 ]](https://assets1.tamsnetwork.com/images/EC042017NF/104430s.jpg "Stampin' Dimensionals [ 104430 ]")
![Paper Trimmer [ 152392 ]](https://assets1.tamsnetwork.com/images/EC042017NF/152392s.jpg "Paper Trimmer [ 152392 ]")
![Clear Block E [ 118484 ]](https://assets1.tamsnetwork.com/images/EC042017NF/118484s.jpg "Clear Block E [ 118484 ]")
![Paper Snips [ 103579 ]](https://assets1.tamsnetwork.com/images/EC042017NF/103579s.jpg "Paper Snips [ 103579 ]")
![Take Your Pick [ 144107 ]](https://assets1.tamsnetwork.com/images/EC042017NF/144107s.jpg "Take Your Pick [ 144107 ]")
![Stampin' Spritzer [ 126185 ]](https://assets1.tamsnetwork.com/images/EC042017NF/126185s.jpg "Stampin' Spritzer [ 126185 ]")
![Blending Brushes [ 153611 ]](https://assets1.tamsnetwork.com/images/EC042017NF/153611s.jpg "Blending Brushes [ 153611 ]")
Thank you so much for stopping by and taking a look at my projects. I’d love to see yours so feel free to drop them in the comments.
Don’t forget to enroll in the Stampin’ Rewards program to build up discounts on your next purchase.
Here are links to my other social media sites – I’d love for you to follow me there, too!
Join my Facebook group
Follow me on Instagram
Follow me on Pinterest
Have a great day – and I hope you get to do something crafty!